Larry’s stuffed jalapeños 

Prep time: 25 mins

Oven temp: 400°

Cook time: 20 mins

Needed: 12 large jalapeño peppers

Additional ingredients below

(Rubber / nitrile cooking gloves)

Using your gloves, Rinse your 12 large jalapeño peppers, cut in half, (be sure to make a little ‘boat’ out of each by leaving stem flesh intact!) remove all seeds! 


DON’T TOUCH YOUR FACE, EYES, OR NAUGHTY BITS AFTER HANDLING THE PEPPERS!!


Set aside open side up on the cookie sheet or pan you plan to bake them in.


Preheat oven to 400°f


Filling:

4oz softened cream cheese

Two cups shredded sharp cheddar

1/2 cup of Texas Pete

1/2 tsp onion powder

1/2 tsp garlic powder

1/2 cup of real bacon bits

1 TBSP dried chopped scallions (unless you want to chop them it fresh?)


Combine all ingredients into a large mixing bowl. Use hand mixer to make them into a paste, should be firm and not too runny (the shredded cheese will stiffen the cream cheese as you mix.)


Place the filling into a large zip-loc bag and cut a 1/2 hole into the bottom corner while twisting the top to keep the filling from coming out (like you are decorating a cake with frosting.) Use the bag to fill the open halves of the peppers from front to back, I pretended to fill them as if they still had a top, the filling will melt down a little when baked.


You may need to add a little to some of the first ones you did if they are uneven or you have filling left over.


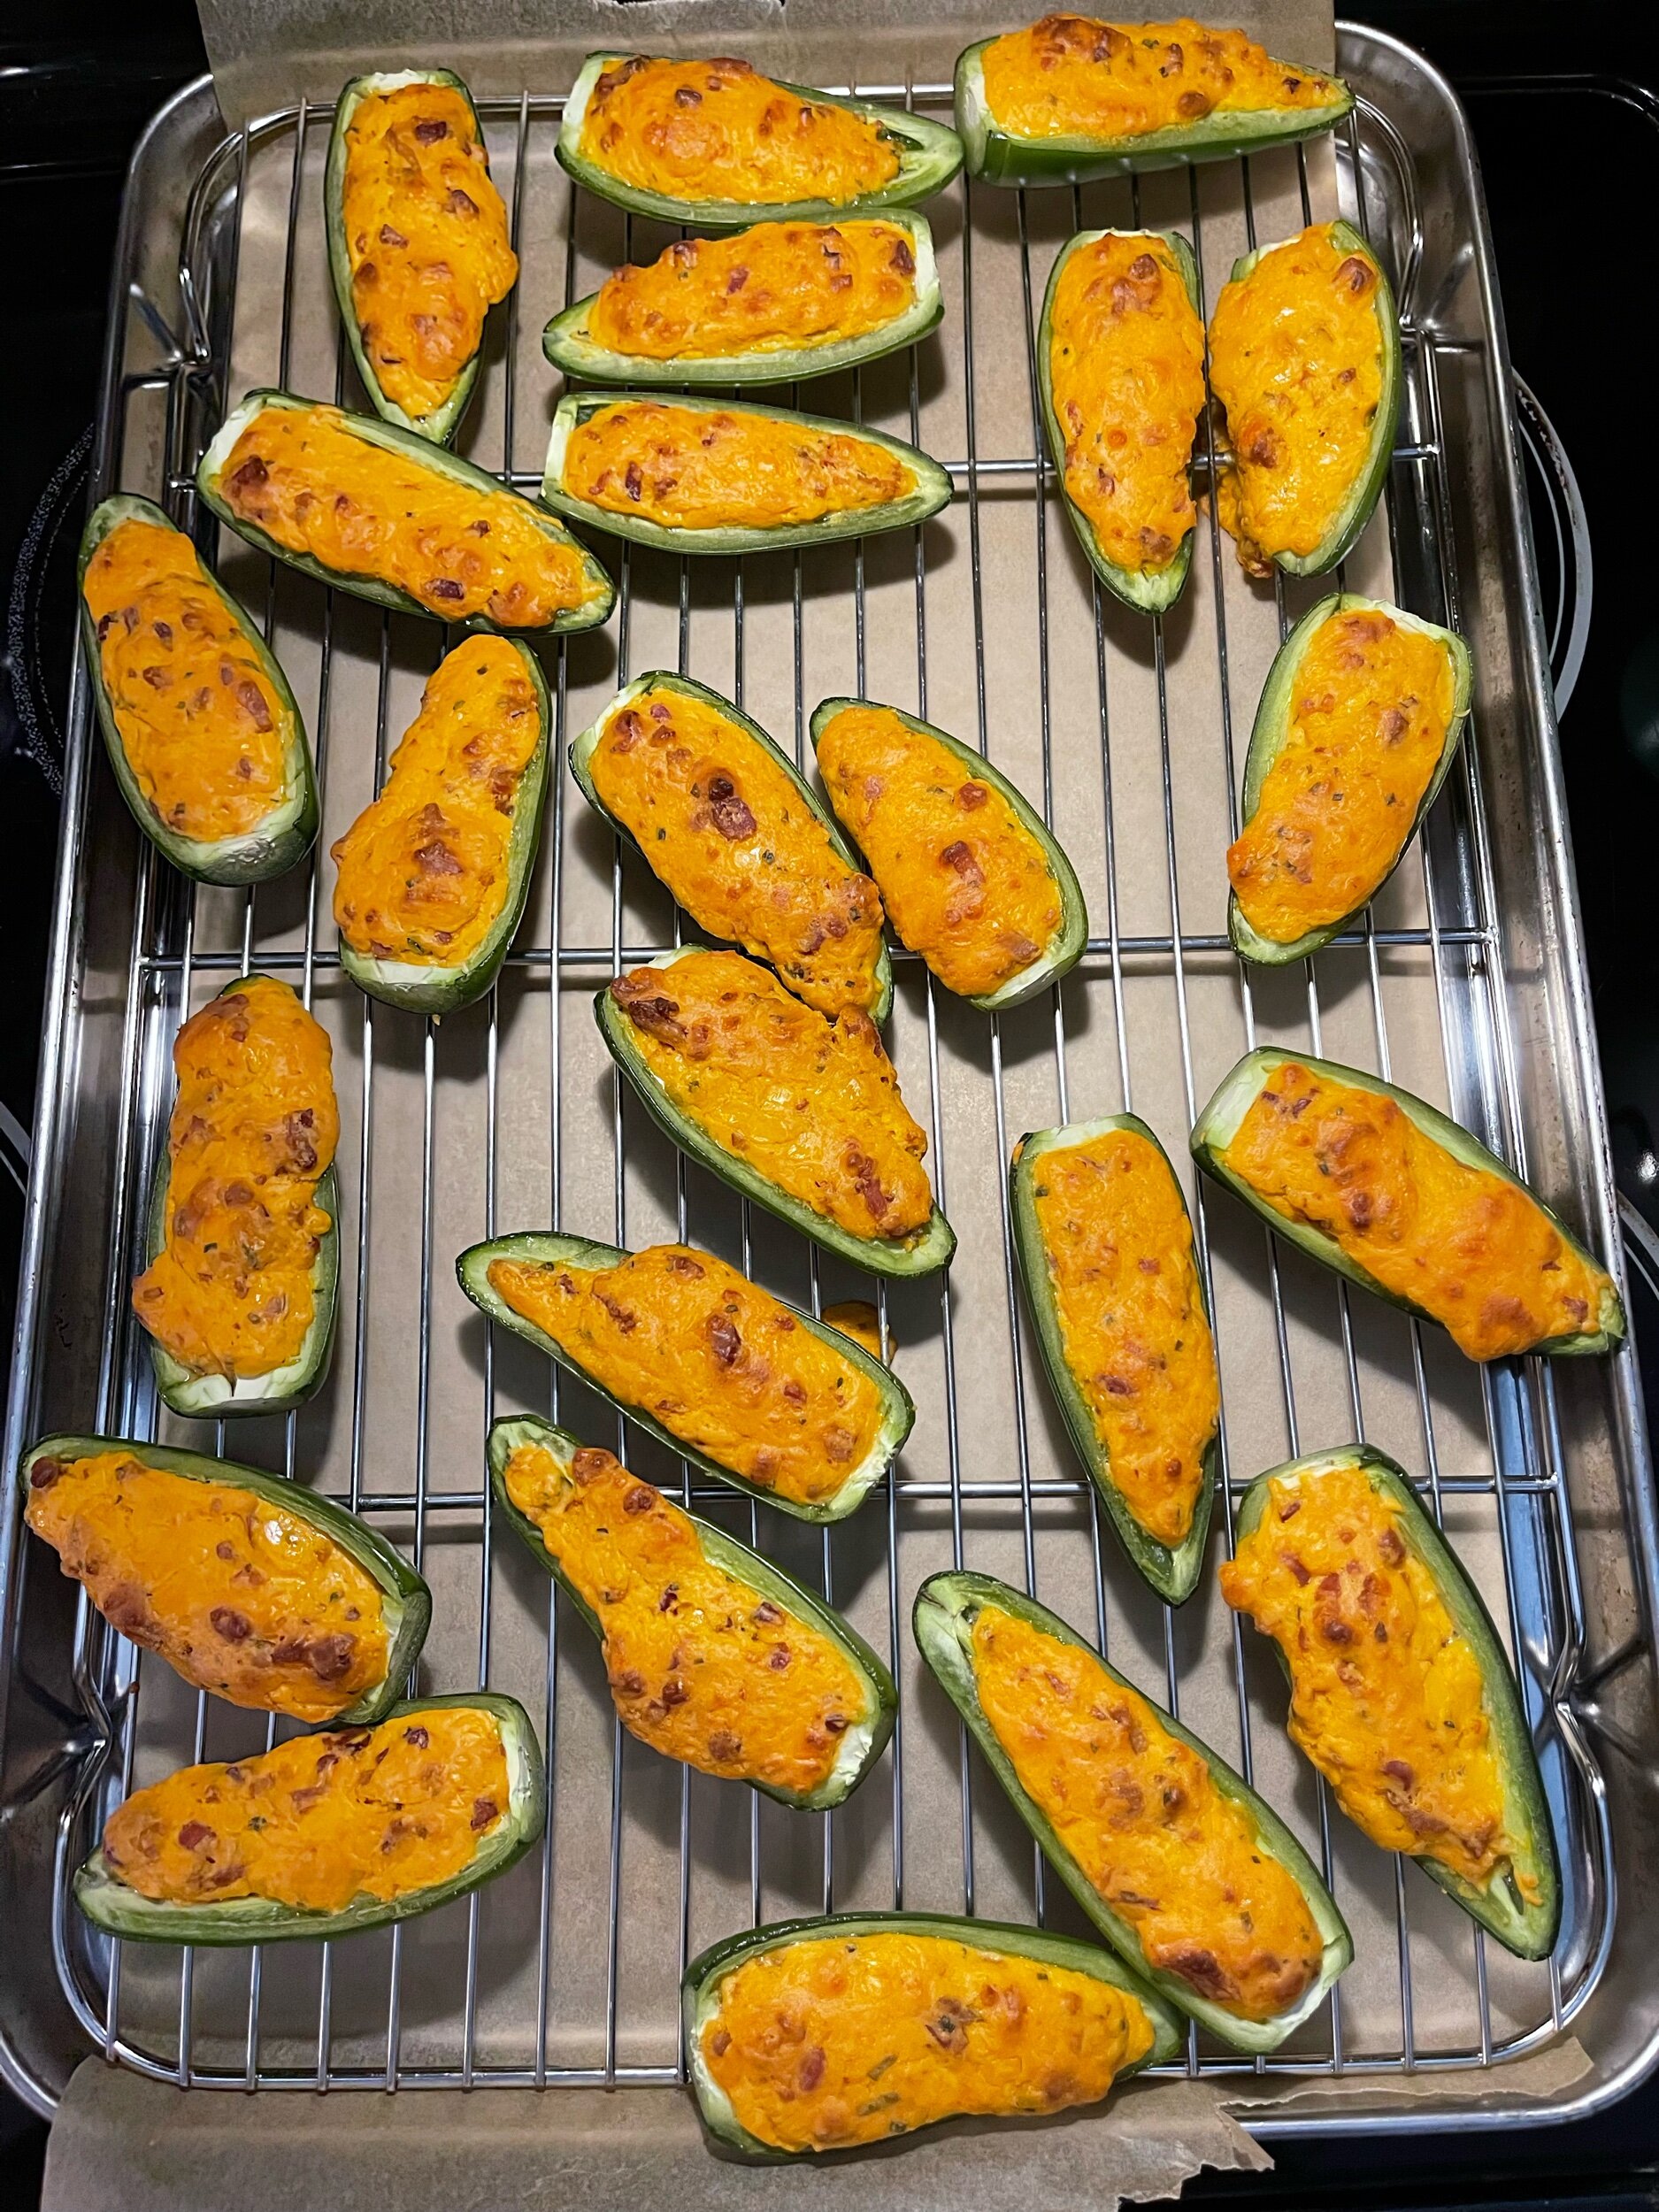
Bake for 20 minutes or until the tops turn slightly brown.


Allow to cool for 10 minutes and serve with sour cream and your favorite cold beverage!


OPTIONAL: If I had been thinking clearly I would have totally put these in the smoker at 300° for 45mins or so. I am an idiot for not thinking about that before baking them!!


Enjoy!

Spencer's Salsa Recipe

Spencer's Salsa

You sit down at your favorite "Mexican-themed" restaurant and order drinks. While the server is away filling your glass with ice and beverage of choice, another server drops off the chips and salsa (very distinctive restaurant salsa they obviously make fresh).

My uncle Spencer thinks he has nailed it with this recipe (& I agree!), you be the judge.

Ingredients:

28 oz diced tomatos (We use the store brand, it is only tomato right?)

½ Med Sweet or White onion

1 tsp Chopped or minced Garlic (Again we use the store-bought minced garlic)

1 tsp Kosher Salt

1/4 cup of Cilantro (tightly packed)

¼ cup pickled (or fresh seeded) Jelapenos

1 lime (for juice)

Chop the onion, measure the garlic and salt, then add them to the tomatoes in your favorite electric blender. Next add the juice from your lime. Finally add the chopped cilantro but be sure to leave it atop the rest of the ingredients to be mixed as they spin about in agony. I ran it on the Smoothie setting for about 20 seconds.

Tomatoes​

Tomatoes​

Onion​ & Salt

Onion​ & Salt

Jalapeño & Garlic​

Jalapeño & Garlic​

​Cilantro

​Cilantro

​After running the "Smoothie" operation for 20 seconds, yummy.

​After running the "Smoothie" operation for 20 seconds, yummy.

Next time I will pre-chop the cilantro adding it later in the mixing process. Plus I'll add more Garlic!​ I must admit, it's not as good as we had on the beach this weekend but that might be in my mind and I like how special that is.The Sea air make…

Next time I will pre-chop the cilantro adding it later in the mixing process. Plus I'll add more Garlic!​ I must admit, it's not as good as we had on the beach this weekend but that might be in my mind and I like how special that is.

The Sea air makes everything much better, right?​

Easy-Peasy Pico De Gallo Recipe!

This is my favorite recipe for a quick healthy satisfying snack for all ages and any time of the year. It's great with a few beers on a Saturday for college football, hoops or even tennis if that is your bag. (Not recommended for watching field hockey, if you do watch field hockey and eat this, please do not tell me.)

Ingredients:

4-6 Fresh, ripe tomatoes

1 Med to large white onion (you can use whatever type you like)

1 Bunch of fresh cilantro (1 cup chopped) BTW, I think the non-organic has a better flavor actually, and much less sand.

1 seeded, jalapeño, minced (I use the pickled store brand since I do this so often, and rarely have a fresh one but when I do have a fresh one, it rocks even more.)

2 very ripe limes.

Salt & Pepper to taste.

Begin by dicing all of your tomatoes. I dice them up as finely as their ripeness allows. Add them to a large mixing bowl.

Next finely chop your onion. Add it to the mixture. Then do the same with your jalapeño:

Chop up your bunch of cilantro, I usually leave as much of the stems out as I can. Now cut your two limes in half and squeeze as much juice from them into the mixture as possible.

Add salt to taste, I like to put a light dash of fresh ground pepper in as well (you know how fresh ground pepper and tomato go so nicely.)

Now stir your ingredients together until uniformly awesome!

Now if you want to blow it all out in the most amazing way ever possible do this: Cut three soft and ripe Avocados. Seed and get as much flesh out of the skins as you can. Put the Avocado in a new bowl. Now this is the really hard part; scoop a cup (or more depending on how large your avocados were) of your fresh Pico and add it to the Avocado halves in the new bowl. Take two knives and cut/stir the mixture together until at a smooth texture, or chunky texture to your liking.

Enjoy with an ice cold beer and the chip of your choice (I love the Snyder's white rounds or yellow tortilla's mainly because they add lots of salt!)

Serve in a fancy bowl (not pictured) and have a great time. Enjoy!

Larry

South West Style Variation: I was driving to get the van serviced and thought it might be great to add a cup or so of drained black beans and a cup or so of canned white corn, then sprinkle a bit of cumin or chili powder or chipotle powder to taste! Stir it up and serve chilled! Wow!! I'm going to try this this weekend.

The Berry Doli (Fruit Infused Vodka) Recipe

So, as many of you may know, while in NJ in October I fell in love with the Berry Doli:

So, as many of you may know, while in NJ in October I fell in love with the Berry Doli:

(Yes, it is $9.50 per serving and worth every penny!)

Let's get to it:

First, the Ingredients:

This is for the Berry Doli, there is a recipe I'll post later for the Melon Doli and the more popular Pineapple Doli. The Berry Doli is my favorite.

2 lbs of frozen Strawberries

2 lbs of frozen Blueberries

2 lbs of frozen Blackberries

2 lbs of frozen Raspberries

2 − 1.5 liters of Vodka

Other things you'll need:

Large glass vessel with lid (mine is 2 gallons.)

A Large colander

A couple inches of Cellophane

A good sized funnel (food grade please)

Cheese cloth

2 ½ cups of sugar

3 cups hot water

A final food safe container for holding and storing the end product. (We used 2 of those "Simply Orange" 89 oz. Jugs.)

The final ingredient is: Patience (Uncle Spencer!!)

(Please don't waste Grey Goose on this recipe, I promise once it is done, no one will be able to tell what brand Vodka you used. Keep the Ketel One in the freezer for Bloody Mary's.) Seriously, do not spend more than $35 on the Vodka. You will spend $50 on the fruit already.

Buy a good sized glass vessel for the steeping/infusion. We found our current one at Target. It holds a little over 1.5 gallons. The spigot came in really handy but does get clogged with pulp during the processing phase.

Buy a good sized glass vessel for the steeping/infusion. We found our current one at Target. It holds a little over 1.5 gallons. The spigot came in really handy but does get clogged with pulp during the processing phase.

Now, this is the fun part! Fill your vessel up with the frozen fruit mixture, while still frozen & pack it in (Do not thaw the fruit!)

Now, this is the fun part! Fill your vessel up with the frozen fruit mixture, while still frozen & pack it in (Do not thaw the fruit!)

Next, Pour in the Vodka. Fill it to the rim! I was able to get 2 liters in there once I shook all the bubbles out. Note I have wrapped the top with cellophane, this was due to the fact I was afraid of the whole mix being ruined by being in direct contact with the cheap plastic lid.

Next, Pour in the Vodka. Fill it to the rim! I was able to get 2 liters in there once I shook all the bubbles out. Note I have wrapped the top with cellophane, this was due to the fact I was afraid of the whole mix being ruined by being in direct contact with the cheap plastic lid.

This is the difficult part: Let the entire mix set for 7 DAYS! Open it every other day and stir it but otherwise leave it alone! (It does not need to be refrigerated at all, set in down on the floor of the corner of the garage and be sure to place it on an old beach towel due to the fact it will sweat since the fruit was frozen.)

Place your Martini glasses into the freezer now so they will be ready!

Next: Day 7: Use a large soup pot or crab boil pot to filter the fruit from the Vodka. I used a regular colander and strained the fruit out of the mix as I poured it into the pot. Once the colander filled with fruit I used a stainless steel mixing bowl to press more juice/Vodka out of the fruit. Once pressed, discard the fruit. (It is harsh to eat due to the booze for which it is now infused. Or make All-fruit 'tipsy-pops' for that perfect frat party!) I'll post that recipe well after my kids have graduated college. :)

Next: Day 7: Use a large soup pot or crab boil pot to filter the fruit from the Vodka. I used a regular colander and strained the fruit out of the mix as I poured it into the pot. Once the colander filled with fruit I used a stainless steel mixing bowl to press more juice/Vodka out of the fruit. Once pressed, discard the fruit. (It is harsh to eat due to the booze for which it is now infused. Or make All-fruit 'tipsy-pops' for that perfect frat party!) I'll post that recipe well after my kids have graduated college. :)

When all the fruit is out, rinse the steeping vessel and dry.

Place your funnel into the top of the clean steeping vessel. Layer the cheese cloth into the bottom of the funnel. Now SLOWLY pour the Berry Vodka from your pot into the cheese cloth-lined funnel atop the original steeping vessel. Trust me, you will want to perform the additional filtration at least once. No one likes picking blackberry pits from their teeth while drinking a Martini. This is also where the patience will pay off.

Place your funnel into the top of the clean steeping vessel. Layer the cheese cloth into the bottom of the funnel. Now SLOWLY pour the Berry Vodka from your pot into the cheese cloth-lined funnel atop the original steeping vessel. Trust me, you will want to perform the additional filtration at least once. No one likes picking blackberry pits from their teeth while drinking a Martini. This is also where the patience will pay off.

After you have filtered the Doli at least once, it is now time to add the simple syrup. This is necessary as a taste factor. Without the simple syrup it will taste like really bad Brandy or cough medicine (Trust Me!) So, now make the simple syrup: I suggest making them one at a time to add until it tastes good to you (for mine it was exactly 3 cups simple syrup). In a glass measuring cup mix: 1 cup HOT water to ¾ cups sugar. Stir until the sugar is completely dissolved. Now add it to the berry Vodka mix, then stir well. Then taste it. Add another and another until it is Good, DO NOT over sweeten it or it will just taste like sugar water with Kool Aid & Vodka in it.

Like I said, I added only 3 cups of simple sugar into my mix. It is exactly like it was at the Red Stone Grille, only not as expensive!

Once you have it sweetened to your liking, pour it into your storing container (This is where the spigot came in really handy.)

Keep the final product refrigerated. We had enough yield for two 89 oz containers once we were done sampling the product along the way.

Serving: In your favorite cocktail shaker, add a handful of ice. Then add a generous serving of the Doli. Shake well until the outside is all sweaty!

Pour it into your favorite frosted Martini glass (remember those you put in the freezer last week? Yeah those!) Presentation is everything! When one pays $10 for a Martini, one should expect a frosty glass.

Pour it into your favorite frosted Martini glass (remember those you put in the freezer last week? Yeah those!) Presentation is everything! When one pays $10 for a Martini, one should expect a frosty glass.

Enjoy!!!

Enjoy!!!

P.S Our 'stash' is down to two servings. It doesn't last long!

P.S Our 'stash' is down to two servings. It doesn't last long!

A couple guys I know want to make enough for a group to share, so we have equipped ourselves for mass-production! (Yes, that will hold 5 gallons, baby!)

A couple guys I know want to make enough for a group to share, so we have equipped ourselves for mass-production! (Yes, that will hold 5 gallons, baby!)

Veggie & Hummus Wrap

So, I was inspired while in NJ for a class I was taking for work. We ordered out for lunch and I discovered the veggie wrap concept for our new 'diet'. This recipe can be modified any way you want (even by adding meat) so I hope you enjoy. Feel free to share any of your favorite ingredient combinations in the comments!

Start with the whole wheat flour tortilla shell. We use the 12 inch since they hold lots of food.

Add a layer of your favorite hummus in the center of the wrap shaped like a rectangle, basically the size of the end product. We currently love this store brand hummus with roasted paprika.

Next, add a layer of fresh sliced tomato followed by a generous sprinkle of fresh ground pepper! Don't add any salt, trust me, any hummus out there is FULL of more sodium than you need for this so avoid adding more salt.

Now, when I first did this I added a layer of fresh sliced cucumber. It is a great flavor, who doesn't like cucumber? However, as I prepare the ingredients on Sundays for use during the week, the cucumbers do not do well in the fridge. So in this recipe I used dill pickles, "sandwich stuffers."

I love red bell peppers!

I mix a little shredded iceberg lettuce and baby spinach.

Now, grab the sides of the wrap and fold them over on top of the edges of the original hummus shape. Then fold the side closest to the chef over top of the stuffings.

Push down on the other side and pull the stuffing inward to compress them firmly without squishing everything. Now simply roll the stuffing over top of the far flap of wrap.

Finally, slice the wrap with a sharp knife, at a slight angle for effect. Stack it on your serving plate and garnish with more veggies!

Go crazy with variations on this recipe. Yesterday I added a layer of raw mushrooms. Mix it up! Use that leftover salad from last night for the stuffing if you want! Enjoy!